Remember the Common Cold? No more. Now it's the flu--all out.
Her fever hit about a half hour after we finished with JSWA this morning and climbed quickly to 102 degrees. Needless to say we won't be doing JSWA tomorrow.
But the cool thing about homeschool is that we can be flexible, right?
So flex for a few days. You probably won't see us until Monday.
But hopefully you don't actually need us. Hopefully you can do this on your own. Remember to use Google and other lovely search engines for ideas and information. Honestly, I don't know how I'd do this without the internet!
Wednesday, September 28, 2011
Day 15: Frank Lloyd Wright to Guide Us
Today Maren chose architecture.
We did a little searching, Googling "architecture interactive activities" and found this site: Architecture Studio 3D.
The site first talks about Wright's concept of good architecture, which is that a building should reflect both the person(s) who uses it and the setting it is placed in. With that in mind, Architecture Studio 3D takes you through a step by step process (in a very easy to use and simplified form) of choosing a client, a location, and designing a house to suit both.
When finished, you can take a virtual tour of your house, actually 'walking' through it and looking into all the rooms. It's pretty cool.
Great little activity. It DOES require the download of the software that is used to create the 3D tour effects.
Tuesday, September 27, 2011
Day 14: The Tempest!
Today, Maren chose theater.
OK, we cheated a little. She's still suffering greatly from her cold and will most likely miss a second day of band class, so we wanted to do something that she could do while chilling on the couch. Not literally chilling. I'm not that cruel of a taskmaster.
At first she chose textile arts. What can you do in textile arts while huddled up in blankets? Not much. I suppose I could have given her a crochet lesson or we could have looked up images of textile arts on the internet, or we could have decided that the simple fact that she is wrapped in textile design was enough to suffice. But we decided to try again anyway and drew THEATER!!
We recently read Leon Garfield's Shakespeare Stories version of "The Tempest," so we decided to take a look at some video clips of the play.
We watched several interpretations, including one done by a bunch of high school kids acting out their simplified version of Act 1 Scene 1, and a "Shakespeare in a Minute" animation, the former utilizing the taking of God's name in vain too frequently and the latter being pretty lame.
We also watched two or three clips of the play being performed on various stages, and a clip of the film version that came out late last year. I don't know. It looks pretty interesting to me. I'll have to see if it's available on Netflix Instant.....
Nope. Not even out on DVD yet and will come out first in BlueRay. DVD release date unknown. *sigh*
There IS a BBC version of "The Tempest" available on InstantPlay, but I have a hunch it may need some previewing.
Monday, September 26, 2011
Day 13: Curses! The Common Cold!
Maren's cuddled under a heap of blankets with a near-empty box of tissues beside her and a heap of used ones in the trash can.
I'll let her off...today. We'll probably just sit around and do some reading. I'm not sure her brain can function well enough to do math or grammar--apparently it's too congested.
Instead, I'll take a minute to brainstorm some ideas for one of the areas of art that you might explore with JSWA.
Hmm. Randomly drawing.......MUSIC!!
Yay! Music is big in my house. I counted a little while ago and found that we have 16 instruments in our house (and our house is by NO means large--quite the opposite) that are used regularly. Plus another dozen that aren't currently being used much or not at all. When we open our front door, instruments fall out. ;-) Seriously, my house is not a quiet place. There is almost always music going on here or one sort or another.
But YOU don't need to spend all your retirement savings away to have music in your home. In fact, you don't have to spend much at all--if anything. Music is everywhere for FREE!
So, for JSWA, how about:
*Play something on a simple musical instrument—a slide whistle, recorder, penny whistle, harmonica, etc.
*Find objects around the house that can be used to make rhythm or sound--pan lids and wooden spoons, ice cream buckets or oatmeal boxes, a shoebox and rubber bands, a piece of 1/2 inch or larger hosing, pieces of PVC pipe cut to different lengths. Experiment making sounds through them with your voice, with the air from your lungs, by drumming on them or strumming them. Try making the rubber bands different lengths to see how the sound changes when you strum them.
*Make up a song using either a musical instrument or your voice.
*Make up new words for an old song you know.
*Make up a tune for a favorite poem.
*Search for and listen to a piece of Baroque music.
*Search for and listen to music from Africa or some other continent or culture, maybe from a country you are studying in school or a country from which a character in a book you're reading comes.
*Search for and listen to music played on a didgeridoo. Look up didgeridoo and learn about the instrument.
*Search for and listen to an Irish fiddle tune, like “Drowsy Maggie.”
*Find out something interesting about Wolfgang Amadeus Mozart.
*Find and watch a video of “The Queen of the Night Aria” from Mozart’s The Magic Flute.
*Learn to trumpet like an elephant by tightly pursing the lips and blowing through them. Like this: http://www.youtube.com/watch?v=kTeKmPhequQ
*Find and watch a video on Youtube of a Drum Corps International performance
*Find and watch a video on Youtube of Bobby McFerrin.
*Learn about the five classes of instruments and why 60 years ago there were only four classes of instruments.
*Find and watch a video on Youtube of someone playing a particular instrument. You can cycle through lots of different instruments throughout the year. You may find one your child is interested in playing someday. There are some amazing videos of a Beat Box Flutist playing "Flight of the Bumblebee" and a pair of Cellists playing Michael Jackson's "Smooth Criminal."
Do you have something to add? I'd LOVE for you to share it with us!
Thursday, September 22, 2011
Day 12: DANCE!
Yesterday just wasn't a good day all around.
After the dentist appointment, Maren was too sore and numb to be able to go to her band class. She took a two hour nap and then we did some school.
Then dear hubby came home from work early. Which was awesome.
He and I started on getting the beets pickled and canned. 21 quarts of pickled beets from our garden! Yum!
While we were out in the garden picking we decided to just take a quick peek at the bees who looked like they'd been disturbed. We smoked them and lifted the lid and just looked inside. The hive wasn't full enough to warrant putting on a new super, so we closed it all back up and were just getting ready to leave them when one of them dive-bombed my face and stung me right on the lip.
Right now, 16 hours later, I look like a new woman--and not in a good way. My entire face is swollen beyond recognition. My upper lip looks like a duck bill. The swelling is approaching my eye and my nostrils are a little bit restricted, but I CAN still breathe fine. I have ice packs on my face and I'm taking Benadryl and Aspirin to try to bring the swelling down at least a little. But I'm destined to look like a sideshow freak for a few days--which I DO NOT need.
At any rate, we're going ahead with school this morning and Maren jumped into the day by choosing Dance for today's JSWA lesson.
There are tons of things you can do with dance in just a few minutes. This is a great opportunity to just put on some music and let the kids GROOVE! But I'm not up to grooving this morning and Maren's still a little sore, so we opted to WATCH dance instead of DO dance.
Today we watched Gene Kelly dance on roller skates! Amazing! Kelly was an incredibly athletic and creative dancer. Most American adults have seen the dance scene from Singing in the Rain. This clip is just as incredible as he soars over the streets on roller skates.
Watch it HERE!
Wednesday, September 21, 2011
Day 11: Dentist Appointment Instead
Maren has a dentist appointment this morning. If we find time later, we'll do a Booster Shot With Art in the middle of the day.
Day 10: Architectural Design
When Maren first chose Architecture from the jar she was a little bummed. Architecture? What could possibly be cool about architecture.
But then I told what she'd be doing.
Maren likes to play a game called Minecraft. It's an in-process game that people are playing as it's being designed. A freeware version is available online, or you can purchase the full version, which includes any and all updates that come down the pike, plus a full copy of the completed version when (and if) it ever IS completed.

My son purchased the full version several months ago and he and Maren have been playing it frequently since.
Basically, it's a world-building game in which you search for materials, gather materials, and build with those materials, all while trying to avoid the evil zombies that come out at night. It's graphics are pretty basic. It has a look similar to a Lego video game--all kind of chunky and blocky.
So I gave her the assignment to build a house--any kind of house she wanted--with the single exception that it had to be the kind of house you might find in the clouds.
I wish I could post a picture of it. It was pretty darn creative! Her entrance is a vertical shaft that you literally climb into the clouds through, and the building is made entirely of glass. It's really a beautiful thing! This project--and this game--were a good fit for her. She's a very spacial kid, so manipulating the game's blocks is a snap for her. In her brain it becomes 3-D and she can mentally rocket through the spaces with ease.
My son was so jealous that his little sister got to play Minecraft for school that he begged to join in too. I let him. His building was a huge gold and glass dome with a spire. It looked almost like a temple. Lovely.
But then I told what she'd be doing.
Maren likes to play a game called Minecraft. It's an in-process game that people are playing as it's being designed. A freeware version is available online, or you can purchase the full version, which includes any and all updates that come down the pike, plus a full copy of the completed version when (and if) it ever IS completed.
My son purchased the full version several months ago and he and Maren have been playing it frequently since.
Basically, it's a world-building game in which you search for materials, gather materials, and build with those materials, all while trying to avoid the evil zombies that come out at night. It's graphics are pretty basic. It has a look similar to a Lego video game--all kind of chunky and blocky.
So I gave her the assignment to build a house--any kind of house she wanted--with the single exception that it had to be the kind of house you might find in the clouds.
I wish I could post a picture of it. It was pretty darn creative! Her entrance is a vertical shaft that you literally climb into the clouds through, and the building is made entirely of glass. It's really a beautiful thing! This project--and this game--were a good fit for her. She's a very spacial kid, so manipulating the game's blocks is a snap for her. In her brain it becomes 3-D and she can mentally rocket through the spaces with ease.
My son was so jealous that his little sister got to play Minecraft for school that he begged to join in too. I let him. His building was a huge gold and glass dome with a spire. It looked almost like a temple. Lovely.
Tuesday, September 20, 2011
Day 9: An Update on Paper and Stories
The paper took a long time to dry--a couple of days. After several hours of it dripping over the kitchen sink with very few visible signs that it was getting any drier, we decided to put it outside, propped up with rocks and such so air could circulate underneath it as well. But when it was done, it was pretty cool. We popped the paper out of the frames after about 24 hours, while they were still a bit damp, and they came out easily and stayed together nicely--no ripping.
It's very thick. You won't be able to use it for origami. And if you're going to use it for watercolor painting it should probably be 'sized' first, which means sprayed with laundry starch, otherwise it'll most likely be too absorbent.
Another thing Maren did with the leftover pulp in the water was make a bowl with a wire mesh kitchen strainer. She just scooped the strainer into the water multiple times until there was an even layer of pulp inside it, then left it to dry. It took a VERY long time to dry--about four days. She has yet to decide what to do with it.
We'll probably make a bit more paper while it's still warm enough outside to dry the paper outside.
But today (well, yesterday if you're keeping track of the dates on my blog posts) Maren drew 'stories' for our JSWA.
Why do I include stories in this program when we also study literature? Because stories are yet another creative outlet. We wanted JSWA to be about all kind of creativity, to show that creative thinking is everywhere.
We talked about stories, short stories in particular, and how they are everywhere. Every picture book ever written is a short story, for example. I'm sure your kids have read or listened to hundreds of picture books. Personally, I have dozens of collections of short stories plus I write them on occasion.
We ended up choosing and reading the story of the Thoroughbred horse from Marguerite Henry's book "Horses." It was more of an essay on the breed, but we pointed out the language that Ms. Henry used to make it interesting. We also noted that short stories can often lead to longer works.
Ms. Henry gave three examples in this one essay that led to novels that she wrote--the Godolphin Arabian that became King of the Wind; the pacers of early England that became Born to Trot; and the legendary racehorse Black Gold.
Thursday, September 15, 2011
A Note on How It's Going So Far
8 days of JSWA and the thing that's bothering me the most is that we're not getting these things done in the short amount of time I envisioned. Mostly because we spend some creative time searching for ideas and some time gathering materials.
I guess I could be more organized and have everything planned ahead. But I'd rather let the creativity flow from the very start--in the deciding and the seeking out ideas and figuring out how to do what we want to do.
So, instead of 15 or 20 minutes, it's taking us an hour. Sometimes less, sometimes more.
And I've decided that's OK. I'm fine with that. She loves it. She actually looks forward to the start of school these days, though her excitement wanes (nay, plummets) when I suggest the maybe we should do some grammar or mathematics afterward. But I think I'm seeing some improvement in her study skills and reading because of the beginning brain-boost.
Worth it? Absolutely.
Day 8: Paper Craft--Making Homemade Paper
Maren drew Crafts for today's JSWA. We talked about what 'crafts' are--using creativity to make or decorate useful or decorative objects. Maren wanted to do something with paper.
So I Googled 'paper crafts' and had a hit for one of my favorite sites for all kinds of things FAMILY--FamilyFun.com.
Years ago we had a magazine subscription to Family Fun Magazine and loved it. I gleaned SO many good and inexpensive ideas for birthday parties and our celebrations of Christmas and Hallowe'en that the price was well worth it at a time when we could hardly afford much of anything. As our family grew older we outgrew the usefulness of having the magazine delivered monthly, but I was delighted to find the correlating website that is free to anyone and is packed with amazing stuff. Some of our all-time favorite family recipes came from Family Fun as well.
At any rate, a couple of years ago our family had an activity in which we made paper-making frames. Just the frames. It wasn't until just today that we finished those frames, adding screening to make them actually usable so we could make paper. The frames are very simple--just four pieces of 1/2 X 1 inch pine held together with screws and wood glue, then the finished frame has been coated with an exterior varnish to protect it from repeated use in water. After that it's just a matter of using an old window screen (or you can buy new window screening at a hardware store) and stapling it on. We used a paper stapler instead of a wood staple gun, as I was concerned that the staple gun would shred the screening. I have an amazing stapler that worked beautifully. It's called a PaperPro. You will never find a better, easier to use, or more powerful hand stapler anywhere. Well worth the price (starting at around $10).
And that's what we did, following the basic paper-making instructions from THIS Family Fun activity.
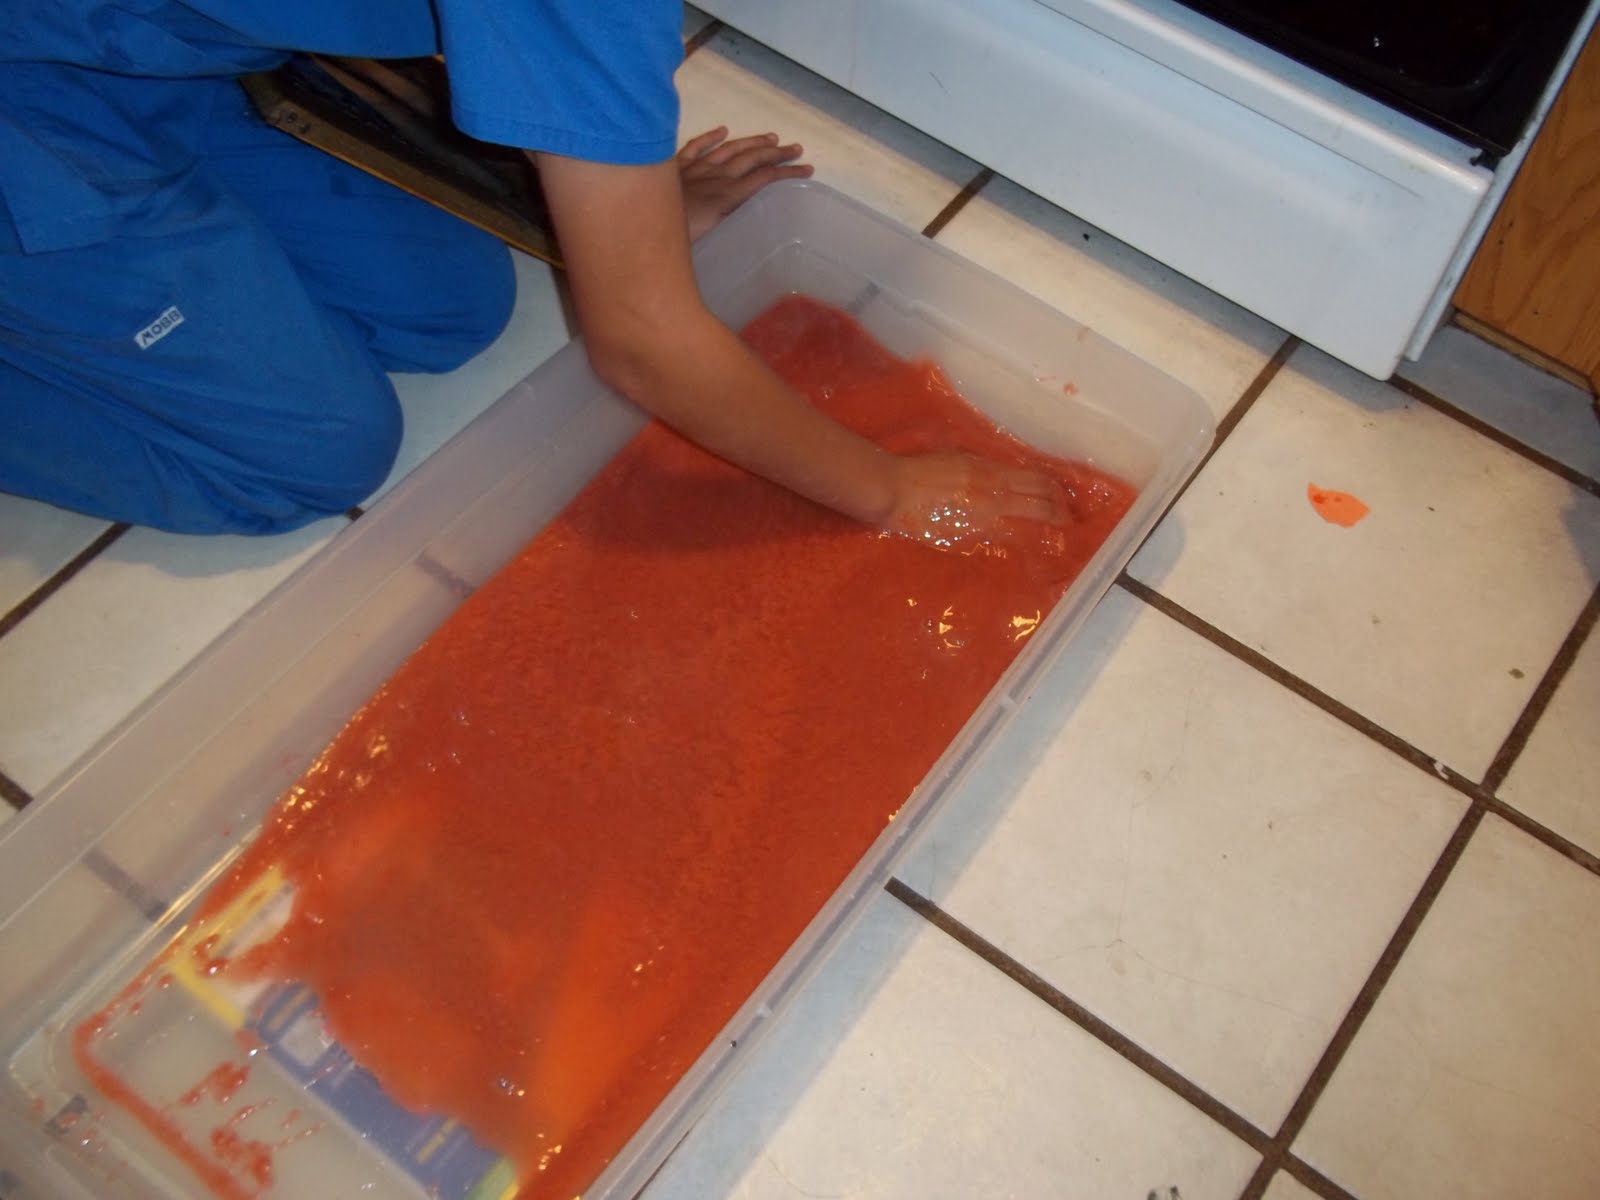
Instead of using the thick pulp and making the bowls, we thinned the pulp with about double the water and used a large under-bed storage box to use as our paper pulp dispenser.
Here, Maren is tearing the newspaper and colored construction paper (for the color) into little bits--about an inch square. Tear, don't cut. You want to preserve the paper fibers intact as much as possible.

Here, we've put the bits of paper into our blender. We then added about four cups water and let it sit from just a few seconds to let the paper soften nicely.

Then, we blend.

Be careful about blending. This process can be stressful on your blender motor. If you have an 'ice breaker' or pulping mode on your blender, use that to blend in short bursts until the larger pieces of paper are chopped up quite small, then you can let 'er rip, blending as thoroughly as you want. If you blend for a long time (2 or 3 minutes) you'll get a more uniform, smoother paper. If you blend for a short time your paper will have larger bits of different colored paper in it, which can result in some interesting effects. You can also add bits of dried flowers or leaves or herbs to add some interesting effects. We did three batches, using a single whole sheet of newspaper and two sheets of construction paper per batch.
Now that the paper is blended and smooth, pour it into a large container. A large tote should work. We used one of those under-bed storage boxes. Now double the amount of water.

Now we're ready to make paper. Read carefully. The technique is fairly important. There needs to be enough water to be able to completely immerse the frame. We had to tilt that big long tote, using a phone book to hold one end up in order to make the water deep enough. If you plan carefully, you'll build your frames just the right size to fit nicely into the container you want to use. A plastic dishtub works well if your frames are made to fit into it. But our method worked fine.
Using a spoon or just your hand, thoroughly mix the pulp and water so the paper pulp is evenly distributed in the water.

IMMEDIATELY (before the pulp has a chance to settle again) immerse the frame in the mixture, immersing first one end and sliding it under the water, sort of like the frame is a ladle and the pulp mixture is soup.

Slowly draw the frame upward, gently shaking it from side to side as you do so. This causes the pulp fibers to align themselves, making the paper stronger. Commercial paper is made using a similar technique. That's why it's easier to tear a piece of paper into strips in one direction than it is the other.

Stop shaking the frame once the water begins draining nicely. Hold the frame over the water and let it drain out until it has almost stopped dripping.

Now put the frame somewhere flat to dry. We've chosen to suspend them over our kitchen sink. You could also place them on a folded towel or suspend them outside, using rocks at the corners of the frames to keep it up off the ground.

You should have enough pulp in your water to do three or four pieces of lovely, thick paper.
Leave it until it's dry, which could take a long time--hours--and it should just pop out of the frame fairly easily. I'll let you know if ours doesn't, but I'm not waiting for our paper to dry to get this posted. After it's dry, you can pull out your iron and iron it to make it smoother if you want.
Now you can use it for whatever you want--other crafts or drawing or painting. I might save mine for paper sculpture!
So I Googled 'paper crafts' and had a hit for one of my favorite sites for all kinds of things FAMILY--FamilyFun.com.
Years ago we had a magazine subscription to Family Fun Magazine and loved it. I gleaned SO many good and inexpensive ideas for birthday parties and our celebrations of Christmas and Hallowe'en that the price was well worth it at a time when we could hardly afford much of anything. As our family grew older we outgrew the usefulness of having the magazine delivered monthly, but I was delighted to find the correlating website that is free to anyone and is packed with amazing stuff. Some of our all-time favorite family recipes came from Family Fun as well.
At any rate, a couple of years ago our family had an activity in which we made paper-making frames. Just the frames. It wasn't until just today that we finished those frames, adding screening to make them actually usable so we could make paper. The frames are very simple--just four pieces of 1/2 X 1 inch pine held together with screws and wood glue, then the finished frame has been coated with an exterior varnish to protect it from repeated use in water. After that it's just a matter of using an old window screen (or you can buy new window screening at a hardware store) and stapling it on. We used a paper stapler instead of a wood staple gun, as I was concerned that the staple gun would shred the screening. I have an amazing stapler that worked beautifully. It's called a PaperPro. You will never find a better, easier to use, or more powerful hand stapler anywhere. Well worth the price (starting at around $10).
And that's what we did, following the basic paper-making instructions from THIS Family Fun activity.
Instead of using the thick pulp and making the bowls, we thinned the pulp with about double the water and used a large under-bed storage box to use as our paper pulp dispenser.
Here, Maren is tearing the newspaper and colored construction paper (for the color) into little bits--about an inch square. Tear, don't cut. You want to preserve the paper fibers intact as much as possible.

Here, we've put the bits of paper into our blender. We then added about four cups water and let it sit from just a few seconds to let the paper soften nicely.

Then, we blend.

Be careful about blending. This process can be stressful on your blender motor. If you have an 'ice breaker' or pulping mode on your blender, use that to blend in short bursts until the larger pieces of paper are chopped up quite small, then you can let 'er rip, blending as thoroughly as you want. If you blend for a long time (2 or 3 minutes) you'll get a more uniform, smoother paper. If you blend for a short time your paper will have larger bits of different colored paper in it, which can result in some interesting effects. You can also add bits of dried flowers or leaves or herbs to add some interesting effects. We did three batches, using a single whole sheet of newspaper and two sheets of construction paper per batch.
Now that the paper is blended and smooth, pour it into a large container. A large tote should work. We used one of those under-bed storage boxes. Now double the amount of water.

Now we're ready to make paper. Read carefully. The technique is fairly important. There needs to be enough water to be able to completely immerse the frame. We had to tilt that big long tote, using a phone book to hold one end up in order to make the water deep enough. If you plan carefully, you'll build your frames just the right size to fit nicely into the container you want to use. A plastic dishtub works well if your frames are made to fit into it. But our method worked fine.
Using a spoon or just your hand, thoroughly mix the pulp and water so the paper pulp is evenly distributed in the water.
IMMEDIATELY (before the pulp has a chance to settle again) immerse the frame in the mixture, immersing first one end and sliding it under the water, sort of like the frame is a ladle and the pulp mixture is soup.

Slowly draw the frame upward, gently shaking it from side to side as you do so. This causes the pulp fibers to align themselves, making the paper stronger. Commercial paper is made using a similar technique. That's why it's easier to tear a piece of paper into strips in one direction than it is the other.

Stop shaking the frame once the water begins draining nicely. Hold the frame over the water and let it drain out until it has almost stopped dripping.

Now put the frame somewhere flat to dry. We've chosen to suspend them over our kitchen sink. You could also place them on a folded towel or suspend them outside, using rocks at the corners of the frames to keep it up off the ground.

You should have enough pulp in your water to do three or four pieces of lovely, thick paper.
Leave it until it's dry, which could take a long time--hours--and it should just pop out of the frame fairly easily. I'll let you know if ours doesn't, but I'm not waiting for our paper to dry to get this posted. After it's dry, you can pull out your iron and iron it to make it smoother if you want.
Now you can use it for whatever you want--other crafts or drawing or painting. I might save mine for paper sculpture!
Day 7: More Bedroom Dreams
Today, Maren decided to work more on her dream bedroom.
She searched for dressers and lamps and area rugs and collected pictures of them all. She still wants to gather pictures of cool shelves and such.
Later we'll visit the hardware store for paint chips.
Well, that makes it easy.
She searched for dressers and lamps and area rugs and collected pictures of them all. She still wants to gather pictures of cool shelves and such.
Later we'll visit the hardware store for paint chips.
Well, that makes it easy.
Tuesday, September 13, 2011
Day 6: Photography--Framing
Today, Maren chose photography.
We looked at the photographs of Ansel Adams and Dorothea Lange on our first day of JSWA.
Today we talked about how photographers often challenge themselves to 'frame' a photograph in accordance with the format of the 'film.' And I say 'film' in quotes because we don't actually use film anymore. Still, with a typical digital camera, the picture will be a specific proportion of heighth to width.
Sure, you can crop photographs--much more easily these days than in the days of film and enlargers--but part of the learning of any artist, no matter what media, is framing. Framing is the process of deciding what will be included within the frame of the finished artpiece.
Painters have the option of simply NOT painting things they don't want within their picture. If, in a landscape, a rock just gets in the way of a lovely tree the artist wants to paint, he can just leave the rock out.
A photographer doesn't quite have that kind of flexibility, because the camera records everything its eye (lens) sees.
So, the photographer has three options:
1. Physically remove unwanted objects or manipulate the subject of the photograph so unwanted objects don't appear in the frame;
2. Adjust the angle of the camera so unwanted objects don't appear in the photograph;
3. (A relatively new option for photographers) Photoshop, including cropping.
The last option makes things easy for today's photographers. And photographers using older methods can still crop photos during the printing process or afterward.
But today's lesson wasn't about cropping. Quite to the contrary. I wanted her to learn to compose a photograph that would NOT need cropping. She had to pay attention to all the elements that appeared within the camera's field of vision and either adjust her position or adjust the elements within the frame to compose the photograph.
Here are a couple in which she didn't pay much attention to composition and framing, or missed elements that she decided she didn't want in the frame:


Here are a couple of good ones in which she 'fixed' the problems with the previous attempts:


For younger children, this is a good day to introduce them to a camera, teach them about proper distance from the subject (most children think they need to be VERY close to the subject) and focusing.
Day 5: My Space
Today, (or rather, yesterday, because I didn't actually get around to posting. *sigh*) Maren chose design.
What is design? Design is using creative skills to come up with useful ideas.
Someone had to design your toothbrush and your house, your shirt and your cell phone. Everything around us that is manufactured went through a design process first.
We can also use design in deciding how to arrange the things around us. For instance, we design our hairdo in the morning, design our wardrobe for the day, design how to arrange the furniture in the living room.
Maren's assignment today was to find some cool designs for her dream bedroom and to make a quick sketch of how she'd like her own bedroom (if she could do what she wanted).
Maren dreams BIG! ;-)
First she started looking at beds. There are a LOT of cool beds for teens out there. She decided on this one--the ultimate in teen leisure:

You can't see it from this angle, but the bed also has a built-in flat screen television monitor on the opposite side from the desk with storage for more CDs or DVDs or Video Games. It has speakers built-in as well.
She really liked the central feature of THIS bedroom:

See that at the front of the picture? Yup. A hot tub, right in the middle of the floor. Sounds great to me!
She likes THIS desk:

She still needs to look for JUST the right dresser, but she also really liked THIS bedroom:

After spending some time searching things like 'cool beds for teens' and 'cool desks for teens' and 'cool bedrooms for teens' she got out the graph paper and scissors and started laying out what she wanted her room to be like.
It's still in process and a project that could take some time to complete. She can do that on her own time, and I'm sure she will. She's caught a bit of the design bug. She can still decide on paint colors by browsing and taking paint chips at the hardware store, she needs to add a dresser and a closet and windows and shelves and cabinets and such. She can also search images of the sheets and blankets she wants, of artwork she'd like on the walls. She can even search images of the perfect lamp and trash can if she wants.
But, since she's dreaming, her dream bedroom is HUGE! About 300 square feet--plenty of space to kick that soccer ball around! At least as long as she doesn't try to fit a pony.
What is design? Design is using creative skills to come up with useful ideas.
Someone had to design your toothbrush and your house, your shirt and your cell phone. Everything around us that is manufactured went through a design process first.
We can also use design in deciding how to arrange the things around us. For instance, we design our hairdo in the morning, design our wardrobe for the day, design how to arrange the furniture in the living room.
Maren's assignment today was to find some cool designs for her dream bedroom and to make a quick sketch of how she'd like her own bedroom (if she could do what she wanted).
Maren dreams BIG! ;-)
First she started looking at beds. There are a LOT of cool beds for teens out there. She decided on this one--the ultimate in teen leisure:
You can't see it from this angle, but the bed also has a built-in flat screen television monitor on the opposite side from the desk with storage for more CDs or DVDs or Video Games. It has speakers built-in as well.
She really liked the central feature of THIS bedroom:
See that at the front of the picture? Yup. A hot tub, right in the middle of the floor. Sounds great to me!
She likes THIS desk:
She still needs to look for JUST the right dresser, but she also really liked THIS bedroom:
After spending some time searching things like 'cool beds for teens' and 'cool desks for teens' and 'cool bedrooms for teens' she got out the graph paper and scissors and started laying out what she wanted her room to be like.
It's still in process and a project that could take some time to complete. She can do that on her own time, and I'm sure she will. She's caught a bit of the design bug. She can still decide on paint colors by browsing and taking paint chips at the hardware store, she needs to add a dresser and a closet and windows and shelves and cabinets and such. She can also search images of the sheets and blankets she wants, of artwork she'd like on the walls. She can even search images of the perfect lamp and trash can if she wants.
But, since she's dreaming, her dream bedroom is HUGE! About 300 square feet--plenty of space to kick that soccer ball around! At least as long as she doesn't try to fit a pony.
Friday, September 9, 2011
Day 4: The Paint Challenge
Maren drew Drawing and Painting this morning.
She LOVES to paint, so she was excited.
We pulled out our new brushes and paints and a new pad of Bristol board. I found the brushes online for around $7, the Reeve's Acrylic Art Paints for $13, and the Strathmore Bristol board on sale for %50 off at Michael's Craft--a sum total of about $25, but we'll be using these materials over and over. We're not forking out that much money for a single project.

We talked about different kinds of paints and different kinds of brushes. We decided to use some of each kind of brush from this set--some are flat, some are round--and a tiny daub of color from each tube of paint to create a painting. The rules were: You must use every color; You must use ALL of every color; You must use both kinds of paint brushes.

That second rule was the hardest. Maren wanted to paint a tree, and I decided I'd do the same. As we painted, we found it was easy to use up the greens and browns. But the darker blues, black, and purple proved something of a challenge. Maren had a hard time with the reds because she chose to paint a summer tree. I had run out of green painting my hill, so I opted for an autumn tree. There went my reds.
In all, we had to use 24 colors--white, 3 yellows, orange, flesh, 3 reds, violet, 4 blues, 4 greens, 4 browns, black, and gray.
In the end, it took a heck of a lot of creative thinking to use up all the paint. Maren's painting began to get considerably more abstract as she worked to use all the colors in SOME way. But she was using her noodle to figure things out, reaching into her creative centers to figure out the problem at hand.
When she was finished she wasn't hugely satisfied with the end result, so she wouldn't let me take a picture.
So we talked about what she didn't like about it. She didn't like her tree. So we talked about some techniques for painting trees and practiced a bit. She didn't like the clouds, so we talked about techniques for painting clouds and practiced that. This is one thing I really love about the Usborne Complete Book of Art Ideas--it teaches technique in drawing or painting a lot of common objects--like skies, clouds, trees, grass, etc. Using those very simple techniques we were able to improve her understanding of how to construct some of those things with paint in a very few minutes.
A word to the wise: Get into the habit NOW of taking good care of paint brushes and teaching your children to do the same. With proper care, a good set of brushes will last YEARS, but if they just ONCE are left to dry with acrylic paint in the bristles, you won't have any choice but to toss them.
Proper brush care:
1. Use cold water ONLY on brushes. Warm or hot water can soften the glue that holds the bristles into the brush.
2. With water-based paints (acrylic, watercolor, etc.) keep brushes you are not using RIGHT NOW soaking in water.

Acrylic paints dry FAST, and once they are dry there is NO removing the paint from the bristles. It's perfectly fine to rub them fairly vigorously against the bottom of the water cup/can to remove the color of paint you've just used. Change the water as needed to prevent muddying the colors on your palette as you mix. Even fairly dirty water won't have much effect on your colors if the brushes are well-rinsed and squeezed as dry as possible in a paper towel or rag before painting with a different color.

3. To clean water-based paint from brushes, simply run under cold water, using your fingers to separate the bristles. Continue until the water runs clear.

If the bristles are a little stained you may try washing them with a little mild soap. Most artists use a bar of Ivory for this. Rinse thoroughly, then reshape the bristles a little with your fingers.

Dry vertically with bristles up or horizontally on a towel.
4. With oil-based paints, do NOT keep unused brushes in water. Oil paint dries very slowly, so brushes can be set aside while not currently in use for several hours before the need to clean them arises. You can also store unused, paint-filled brushes without cleaning if you wrap them thoroughly in plastic wrap, removing as much air as possible. When you want to clean a brush, use a paper towel or rag to wipe as much of the paint out of the bristles as possible. Now wash the bristles with mild soap (a bar of Ivory works very well, though a mild dish liquid works fine, too) under cold running water. The technique is as follows: Wet the bar of soap or squirt a quarter-sized pool of dish soap into the palm of your hand; Rub the side of the bristles (both sides) on the soap until the soap is thoroughly incorporated into the bristles;

Now rub the bristles in the palm of your hand (lots of color should be coming out of the bristles);

Rinse and repeat until the soap no longer draws color from the bristles; Use a paper towel or rag to remove as much water as possible. Reshape bristles and leave to dry.
5. With ALL kinds of brushes, dry and store either horizontally or vertically with the bristles UP. The cup or can you use for your water can double as a paint brush storage container.

6. Teach your child to paint JUST with the bristles. Too much pressure exerted on paint brushes (so that the child is painting with the stick instead of the bristles) will damage the bristles irreparably. This is particularly true of watercolor brushes, which have MUCH softer bristles than brushes used for oils or acrylics.
Ah! It's the weekend. We'll see you again on Monday!
Thursday, September 8, 2011
Day 3: And the Winner Is...
Our first day drawing out of our creatively conjured choosing system and she picks out the one that is her least favorite--poetry.
By the way, I suppose I should list what our numbers stand for:
1. Drawing/Painting
2. Sculpture
3. Photography
4. Design
5. Crafts
6. Architecture
7. Textiles
8. Music
9. Dance
10. Film
11. Theater
12. Poetry
13. Stories
14. Mythology/Fairy Tales
15. Masters
16. Masterworks
Right there. Number 12.
*Sigh*
But we got it done.
It wasn't so bad.
We spent a few minutes talking about poetry form. One of her favorite television programs is Nickelodeon's animated Avatar: The Last Air-Bender (which, by the way, is SO much better than M. Night Shyamalan's film version of it as to be laughable). In one episode of that show one character, Saka, engages in a Haiku competition with a teacher of Haiku.
We talked about the strict format of the Haiku (5,7,5 syllables) and a few other forms of poetry with specific format rules.
I assigned her to write a poem with our own strict format rules. (For all I know there could already be a poetry format fitting our guidelines--there are literally hundreds of them out there and no 'rule' against creating new formats at will. Isn't poetry awesome?) She was to write a five line poem with five words per line.
The hard part was coming up with a subject. We talked about how poems can be about anything--from the exciting to the completely mundane, and how it can sometimes be fun to write a poem about something so ordinary that you wouldn't normally consider creating a poem about it. Like my shoe photographs. Except in shoe store advertisements we generally don't pay much attention to our shoes. We probably wouldn't think of them when we consider a subject for a piece of art. But years ago I started taking pictures of my shoes, while they're on my feet doing different things. I have pictures of my shoes at Drum and Bugle Corps competitions and in San Francisco, as well as more mundane settings, like on a sidewalk next to a melted popsicle.

She could have chosen to write a poem about a paper towel and still made it interesting.
She didn't choose to write about a paper towel.
Instead she chose to write about something that she loves and that interests her--her pet rabbit.

That's it! It was quick and easy and got her brain thinking creatively first thing in the morning. Now she's showered and ready to go on with the rest of the day.
By the way, I suppose I should list what our numbers stand for:
1. Drawing/Painting
2. Sculpture
3. Photography
4. Design
5. Crafts
6. Architecture
7. Textiles
8. Music
9. Dance
10. Film
11. Theater
12. Poetry
13. Stories
14. Mythology/Fairy Tales
15. Masters
16. Masterworks
Right there. Number 12.
*Sigh*
But we got it done.
It wasn't so bad.
We spent a few minutes talking about poetry form. One of her favorite television programs is Nickelodeon's animated Avatar: The Last Air-Bender (which, by the way, is SO much better than M. Night Shyamalan's film version of it as to be laughable). In one episode of that show one character, Saka, engages in a Haiku competition with a teacher of Haiku.
We talked about the strict format of the Haiku (5,7,5 syllables) and a few other forms of poetry with specific format rules.
I assigned her to write a poem with our own strict format rules. (For all I know there could already be a poetry format fitting our guidelines--there are literally hundreds of them out there and no 'rule' against creating new formats at will. Isn't poetry awesome?) She was to write a five line poem with five words per line.
The hard part was coming up with a subject. We talked about how poems can be about anything--from the exciting to the completely mundane, and how it can sometimes be fun to write a poem about something so ordinary that you wouldn't normally consider creating a poem about it. Like my shoe photographs. Except in shoe store advertisements we generally don't pay much attention to our shoes. We probably wouldn't think of them when we consider a subject for a piece of art. But years ago I started taking pictures of my shoes, while they're on my feet doing different things. I have pictures of my shoes at Drum and Bugle Corps competitions and in San Francisco, as well as more mundane settings, like on a sidewalk next to a melted popsicle.

She could have chosen to write a poem about a paper towel and still made it interesting.
She didn't choose to write about a paper towel.
Instead she chose to write about something that she loves and that interests her--her pet rabbit.
My bunny’s name is Thumper.
He is a good bunny
Except when he knocks over
His food dish in mornings.
But he’s a good bunny.

That's it! It was quick and easy and got her brain thinking creatively first thing in the morning. Now she's showered and ready to go on with the rest of the day.
Wednesday, September 7, 2011
Day 2: Figuring Things Out
Today Maren and I used our creative thinking to figure out how we would choose what sort of thing to do each day in Jump-Start With Art.
She already uses a couple of choosing devices for her schooling. She chooses a poem to read each day from a jar full of slips of paper, each with a poem's title, the book to find it in, and the page it's on.
She uses marked magnets on a magnetic board to choose which order to study her day's subjects.
We both thought something similar might work for us. We decided it needed to be something we could choose randomly, and, because we would be using them over and over, it needed to something more sturdy than paper.
But what?
We hit the junk drawers and closets to see what kind of inspiration we could find, and we found HOT GLUE!!

We both knew that hot glue "dries" clean and solid. It just might work to make some kind of coin.
We just happen to own a half dozen mini muffin tins that we've used for dozens of craft AND cooking projects over the years. If we could fill the bottoms of those tin compartments with hot glue, we could have a bunch of very neat little 'plastic' discs that we could write on. Oh, and we decided it would be a good idea to grease the tins. The grease would wash off easily enough after the glue had solidified.

However, the tins are made of aluminum, AND, because I'm an AMAZING homeschool mom, we turned this experiment into a science discussion. Aluminum is a FABULOUS conductor. We studied conductivity and other modes of energy transfer in science last year, so we were able to see how those principles apply in our daily life and how, sometimes, they can be a problem that needs to be solved.
Because aluminum is such a great conductor, it cools too quickly, and instead of having a nice smooth-bottomed disc when we squeezed the hotglue out of the glue gun, we had what looked like a flattened bunch of white worms.
What to do?
Well, how can we make the muffin trays hot? The oven, of course.

Luckily it's not July anymore, and it wasn't too oppressively hot to turn on the oven. We put the trays in and heated them up to 350 degrees and tried filling them again.
But, because aluminum is such an AMAZING conductor (have I stated that before?) the trays cooled too quickly. The first disc worked OK, but the rest were not much better than the first ones.
Next?
Violence!! We took out our scissors and CUT THOSE GLUE STICKS INTO LITTLE BITS!!! Then we put the bits in the muffin tin cups and baked them until the glue melted completely.

And because aluminum is such an AMAZING conductor, the trays and the glue cooled pretty quickly.
After that it was a simple matter of prying the discs out of the tins--we used a knife, but I imagine a toothpick would work--trimming the edges of the discs to make them look nice and marking them with a permanent marker, numbered 1 to 15 for the 15 areas of art study we intend to tackle.


Now, I hope no one out there is going to copy our idea. That's NOT the purpose of JSWA. YOU should come up with your own solution that utilizes junk YOU have around YOUR house, and better reflects the needs of YOUR homeschool.
Tuesday, September 6, 2011
Day 1: Introduction
First day of school!
We've met it with a mixture of excitement and trepidation. No one in this house willingly abandons the joys of summertime for nine months of servitude to books. OK, I have to qualify that. We love books in this house--as long as they're books that we read by our OWN choosing, not the choosing of someone else.
Don't get me wrong. I'm a fairly loose schooler, leaning MUCH more toward the unschool approach than when we first started this homeschool adventure 8 years ago.
This morning we started with a Jump-Start With Art program by introducing to my daughter just what we would be doing. And you know what? By the end of it, and by the end of a little stop-animation project we did, she was ready and eager to jump into some other subjects.
First, we looked at our blog. I explained to her that I'd be posting daily on our blog about what we'd done that day, AND taking pictures. She wasn't QUITE so excited about that last prospect.
We then talked about the definition of art.
So, I ask you: What is art?
I liked this series of definitions from Dictionary.com that were most useful for our purposes:
These definitions emphasize creation, skill, imagination, activity, and production. All excellent words when we're talking about the purpose of JSWA.
We then detailed the different areas of art and looked at or talked about some examples. Those areas are:
1. Visual arts:
i. Drawing and Painting
ii. Sculpture
iii. Photography
iv. Design
v. Crafts
vi. Architecture
vii. Textile Arts
2. Performance Arts
i. Music
ii. Dance
iii. Film
iv. Theater
3. Literary Arts
i. Poetry
ii. Stories
iii. Mythology
iv. Fairy Tales
4. Art History
i. Masters
ii. Masterworks
As you can hopefully see, many of these artistic areas overlap subjects like Language Arts, Literature, and History. Use them to help enrich your study of those other subjects, reminding your student that these are also arts, that they were created imaginatively.
We spent some time also looking at examples of some of these art forms.
We looked at representative paintings by Eric Dowdle to show that artists can produce artwork from nature, but that they often change it to make it more stylistic and abstract. (Look at all those great vocabulary words!) We looked at photographs by Ansel Adams and Dorothea Lange to show how two photographers used different techniques to produce beautiful photographs. (Adams manipulated the development process to cause subtle and beautiful changes in the final result; Lange put her greatest effort into composing the frame of the photograph to include only what she wanted to appear inside it.)
We looked at examples of both representative and abstract sculpture, talked about design being an avenue for the creation of something useful, how crafts are artworks that are generally useful and decorative in nature, how architecture can be an amazingly artistic and creative way to put design into reality (Google 'great architecture images' and see what amazing examples you'll find.), we found a picture of an amazing textile artwork created from nylon zippers!
My daughter, as our whole family, loves films. We watch a great many movies in our family. She enjoys theater--either live or on film. She was excited to learn that we would actually be watching films--or snippets of films--as part of our JSWA explorations.
She was also excited to learn that we were going to study literature--including her favorite: mythology--as part of our JSWA. OK, let me qualify that. She's not a big reader. And that's OK. Her natural educational talents lie elsewhere. But she does love mythology. We're going to compare how several different authors have handled the retelling of the old mythological tales, and how the structure of fairy tales work to exact a specific purpose--essentially, they are frightening stories told to children in a harsher world than the one in which we live meant to frighten them into obeying their parents.
We also talked about Art History. She was able to recognize the names of several great masters of art as well as several great masterworks. Here she is with Da Vinci's Mona Lisa:

After that we spent a little bit of time going over the rest of her curriculum for the year. She's a bit overwhelmed, but it's her 7th grade year. There's more to do. There won't be any more slacking with easy elementary age schoolwork.
Then we did a project--one that takes a bit more time than you might be prepared to handle with JSWA. This one took us close to an hour, though we could have been better prepared for it and done it much more simply.
We did a stop-animation film of a wizard vs. viking battle using Lego/Mega Block figurines, some clay, and some vegetables. We used a freeware program called JPG Video and a simple digital camera. Unfortunately it was taking WAY too long to upload it to Blogger, so you're just going to have make your own.
Then I broke the bad news to her. We were not, in fact, done with school for the day. It was only 10 A.M. No, no, my dear. Let's see what else we can get done. So, right now? Math. She can deal with math.
We've met it with a mixture of excitement and trepidation. No one in this house willingly abandons the joys of summertime for nine months of servitude to books. OK, I have to qualify that. We love books in this house--as long as they're books that we read by our OWN choosing, not the choosing of someone else.
Don't get me wrong. I'm a fairly loose schooler, leaning MUCH more toward the unschool approach than when we first started this homeschool adventure 8 years ago.
This morning we started with a Jump-Start With Art program by introducing to my daughter just what we would be doing. And you know what? By the end of it, and by the end of a little stop-animation project we did, she was ready and eager to jump into some other subjects.
First, we looked at our blog. I explained to her that I'd be posting daily on our blog about what we'd done that day, AND taking pictures. She wasn't QUITE so excited about that last prospect.
We then talked about the definition of art.
So, I ask you: What is art?
I liked this series of definitions from Dictionary.com that were most useful for our purposes:
1. a. the creation of works of beauty or other special significance
b. ( as modifier ): an art movement
2. the exercise of human skill (as distinguished from nature )
3. imaginative skill as applied to representations of the natural world or figments of the imagination
4. a. the products of man's creative activities; works of art collectively, esp of the visual arts, sometimes also music, drama, dance, and literature
These definitions emphasize creation, skill, imagination, activity, and production. All excellent words when we're talking about the purpose of JSWA.
We then detailed the different areas of art and looked at or talked about some examples. Those areas are:
1. Visual arts:
i. Drawing and Painting
ii. Sculpture
iii. Photography
iv. Design
v. Crafts
vi. Architecture
vii. Textile Arts
2. Performance Arts
i. Music
ii. Dance
iii. Film
iv. Theater
3. Literary Arts
i. Poetry
ii. Stories
iii. Mythology
iv. Fairy Tales
4. Art History
i. Masters
ii. Masterworks
As you can hopefully see, many of these artistic areas overlap subjects like Language Arts, Literature, and History. Use them to help enrich your study of those other subjects, reminding your student that these are also arts, that they were created imaginatively.
We spent some time also looking at examples of some of these art forms.
We looked at representative paintings by Eric Dowdle to show that artists can produce artwork from nature, but that they often change it to make it more stylistic and abstract. (Look at all those great vocabulary words!) We looked at photographs by Ansel Adams and Dorothea Lange to show how two photographers used different techniques to produce beautiful photographs. (Adams manipulated the development process to cause subtle and beautiful changes in the final result; Lange put her greatest effort into composing the frame of the photograph to include only what she wanted to appear inside it.)
We looked at examples of both representative and abstract sculpture, talked about design being an avenue for the creation of something useful, how crafts are artworks that are generally useful and decorative in nature, how architecture can be an amazingly artistic and creative way to put design into reality (Google 'great architecture images' and see what amazing examples you'll find.), we found a picture of an amazing textile artwork created from nylon zippers!
My daughter, as our whole family, loves films. We watch a great many movies in our family. She enjoys theater--either live or on film. She was excited to learn that we would actually be watching films--or snippets of films--as part of our JSWA explorations.
She was also excited to learn that we were going to study literature--including her favorite: mythology--as part of our JSWA. OK, let me qualify that. She's not a big reader. And that's OK. Her natural educational talents lie elsewhere. But she does love mythology. We're going to compare how several different authors have handled the retelling of the old mythological tales, and how the structure of fairy tales work to exact a specific purpose--essentially, they are frightening stories told to children in a harsher world than the one in which we live meant to frighten them into obeying their parents.
We also talked about Art History. She was able to recognize the names of several great masters of art as well as several great masterworks. Here she is with Da Vinci's Mona Lisa:

After that we spent a little bit of time going over the rest of her curriculum for the year. She's a bit overwhelmed, but it's her 7th grade year. There's more to do. There won't be any more slacking with easy elementary age schoolwork.
Then we did a project--one that takes a bit more time than you might be prepared to handle with JSWA. This one took us close to an hour, though we could have been better prepared for it and done it much more simply.
We did a stop-animation film of a wizard vs. viking battle using Lego/Mega Block figurines, some clay, and some vegetables. We used a freeware program called JPG Video and a simple digital camera. Unfortunately it was taking WAY too long to upload it to Blogger, so you're just going to have make your own.
Then I broke the bad news to her. We were not, in fact, done with school for the day. It was only 10 A.M. No, no, my dear. Let's see what else we can get done. So, right now? Math. She can deal with math.
Thursday, September 1, 2011
The Dyeing Experiment: An Update
How's it going, you ask?
Not so well.
I first tried using craft-grade acrylic paints.
Did you know that craft paint makers do not know how to make an actual red. Oh, no. Apparently all those crafty chicks just LOVE pink, because every color of red craft paint is really just a variation of pink--just a very dark pink. When you water it down it entirely ceases to be red, which it shouldn't do.
Pink is NOT just watered down red. Pink is, in fact, LIGHTENED red with a bit of some other color added to make it distinct from red--usually blue if you want a cool pink and yellow if you want a warm pink.
When red is watered down it should still be red. Pale red, but NOT pink.
Here's the first attempt from last week. Granted, I washed the sheets afterward, which removed some of the excess pigment and lightened the color:

Not a bad color, but not dark enough.
So today I went out and bought more paint (all of which turned out to just be different shades of pink) and tried again. Second attempt:

Again, a nice color, but definitely not RED!
Third attempt, I used the leftovers from an old tube of artist acrylic color. It had a better redness, but didn't dissolve very well. I also added some brown craft paint to deepen it further. Most browns are made from a combo of black and orange anyway, so browns are generally complimentary to reds when mixing. Anyway, one big advantage to craft paints it that they're already thinned down quite a bit and thin very well with water. But, as you can see, it's still not a good vibrant red:

Fourth attempt, I added some purple and more brown with the red craft paint (I'd used up all the red artist paint for the previous batch) but it still isn't RED:

Maybe you can't tell the difference. But what matters is that I can tell the difference, and I'm not happy with any of them.
Next attempt--either more artist paint or maybe a quart of some nice deep red from Home Depot.
Subscribe to:
Posts (Atom)